
But today we are here for that Miu Miu sneakers DIY.


Source: Google Images
I was really excited to try it! I didn't have the best material but only a pair of sneakers that I was planning to sell at the flea market and I thought, why not try on this! I wasn't going to wear them anyway, so let's try to do a shoe makeover! I was thinking about getting myself a pair of glitter sneakers soon but I wasn't sure exactly which one so this DIY comes in the right time! I followed a DIYrealized by Honestly WTF, you can find it here. (Ps. You should check all of her DIY because they are GREAT!) I actually love even more what comes out of this DIY rather than the Miu Miu sneakers! What do you think?
Anyway, my sneakers were black and silver so I didn't want to go for gold color but I think that those realized by Honestly WTF are great, especially for Summer time! For mine, I chose to mix black and silver glitter. Let's say they are bit more Fall-ish sneakers ... But I still don't know how my sneakers will go with the rain! I'll let you know!
Here is what you need for realizing your Miu Miu Sneakers:
- a pair of sneakers (if you don't have, I advise to buy those white Vans so then you can pick any color you want, otherwise, just take some old sneakers)
- waterbase glue (25ml)
- glitter (20-25 gr)
- a small and medium brush
- assorted rhinestones, diamonds, studs, spikes (whatever you like!)
- tape (I used the one to paint windows, or to not paint them :)
- little plastic pot (to put your glue and glitter mix)
- glue gun or adhesive (adhesive probably is much better than my glue gun!)

Step1. Start taping the sole of your sneakers and the part where you don't want glitter on. If you want a replica of Miu Miu sneakers, you should also tape the top of your sneakers (little bit like the white part of Converse in the front you see?)


Step2. Start mixing the glue and glitter in the little plastic pot. The amount of glitter and glue depends very much on your sneakers. I used bit less than 25ml of glue and 15 gr of silver glitter and around 8 gr of black glitter.


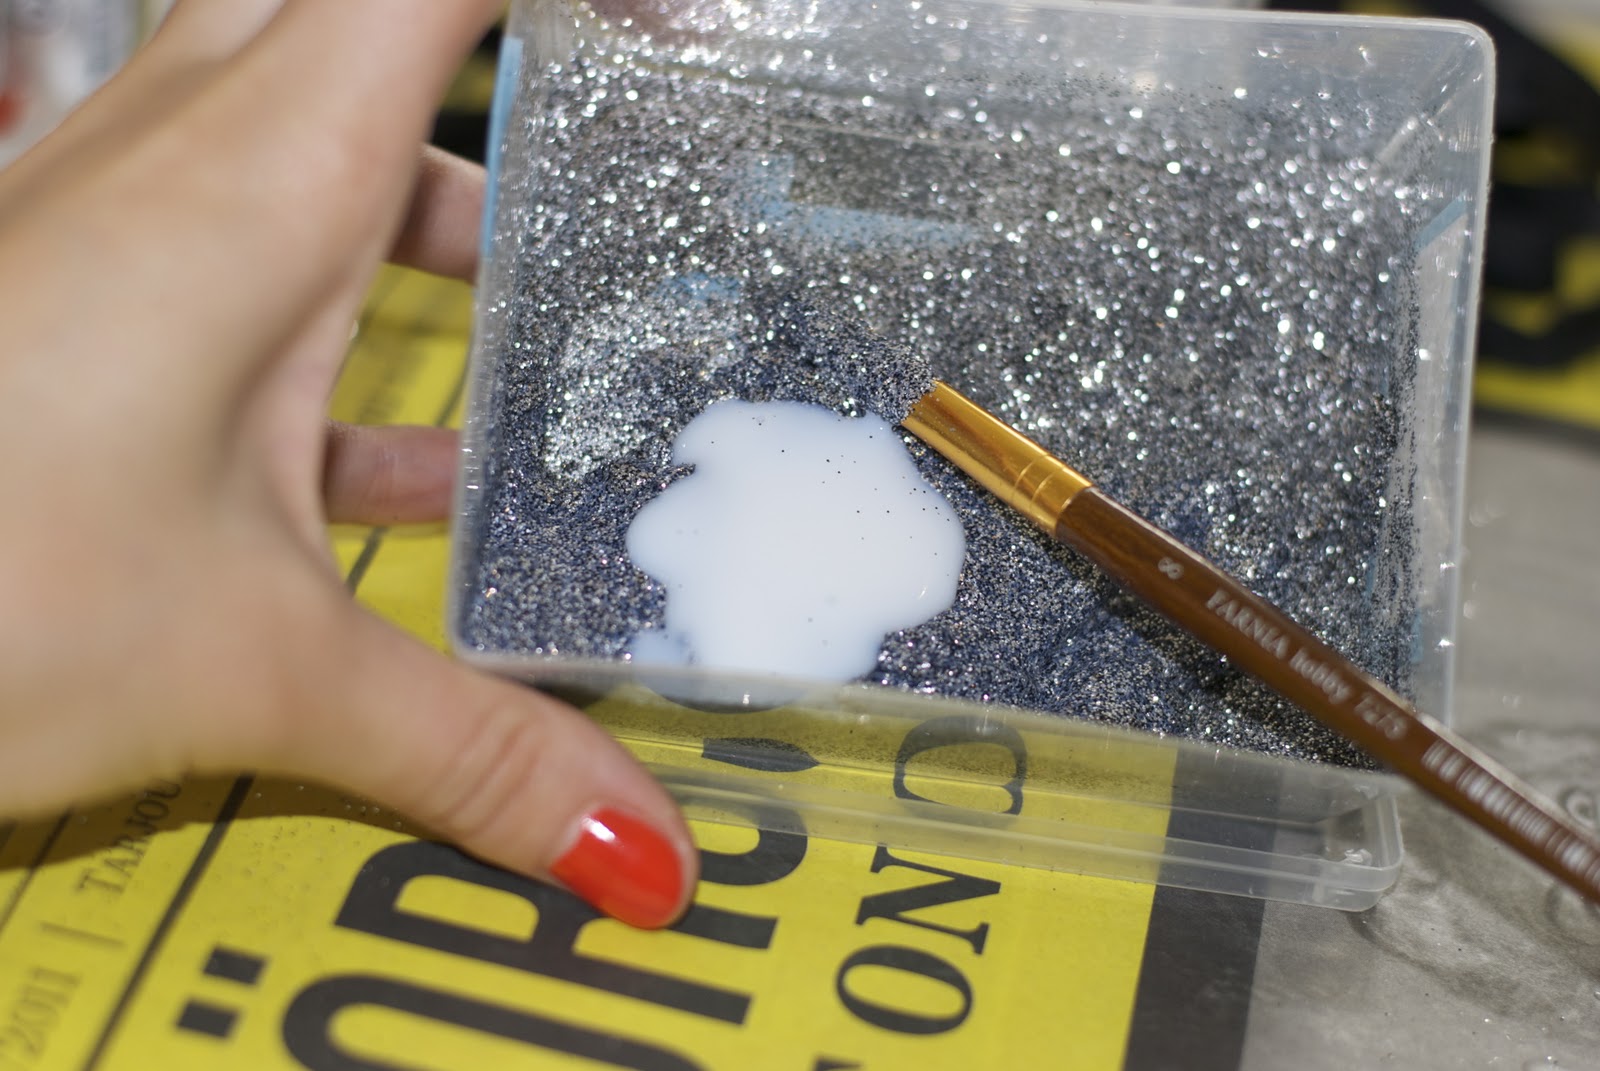
Step3. You can take your medium brush and start painting on your sneakers with the glitter/glue.


Step4. Let it dry, and when it's dry, take the tape away. You can also put the laces back on your sneakers.

Step5. I had to paint little bit the front part because there was silver and black and I wanted to have uni color but this might be only optional step for those that have uni color sneakers.


Step6. You can start applying those rhinestones, diamonds on the front of the sneakers. I applied rhinestones and also studs. I just went for what I had... I used the glue gun to stick the rhinestones on the front of the sneakers but I'm really not sure how long the rhinestones will last on my sneakers! (I'll keep you updated :)


You are done!


Do you like it? What do you think?
Fr: Bonjour bonjour, pardonnez ma longue absence mais j'ai été occupée et un peu paresseuse je dois dire! Nous étions partis un long weekend à Stockholm, et puis le weekend suivant nous sommes allés au dernier mariage de l'été à Nokia (près de Tampere). Enfin nous avons passé un weekend dans la maison d'été d'amis près de Syysma. Je pense que nous avons eu le dernier beau weekend de cette année. On a eu beaucoup de chance avec le temps! Et entre tout ça, je me suis collée à de la recherche d'emploi. En Finlande c'est assez difficile de trouver un job quand on ne parle pas couramment Finnois. Ca me fait très bizarre, tous mes amis sont retournés à l'école ou alors ils bossent, et moi je viens d'en finir avec l'Université alors c'est maintenant la case recherche d'emploi! Enfin bref, je ne vous embête pas avec ça mais je vous présente le nouveau projet que j'ai tenté: les baskets Miu Miu. Je réfléchissais depuis un moment à des baskets pailletées mais je ne savais pas lesquelles prendre. Ce DIY est donc arrivé au bon moment! J'avais encore une vieille paire de baskets que j'avais essayé de vendre au marché aux puces alors je l'ai mise à contribution :) En revanche, si vous voulez réaliser ce DIY et que vous n'avez pas de baskets sous la main, je conseille vivement d'acheter des Vans blanches (comme pour Honestly WTF). Moi je n'ai pas pu avoir tellement de choix pour la couleur de mes baskets. Elles étaient noires et argentées donc j'ai été obligée de me tourner vers des paillettes noires et argentées aussi! Mais j'avoue que j'ai un gros faible pour les dorées!
Pour ce DIY, vous aurez besoin de:
- une paire de baskets
- de la colle waterproof
- des paillettes (couleur de votre choix)
- petit et moyen pinceau
- assortiments de faux diamants, clous, ce que vous voulez utiliser pour décorer le bout de vos baskets
- du scotch
- un petit pot en plastique (pour mélanger la colle et les paillettes)
- un pistolet à colle pour décorer l'avant de vos chaussures (en revanche, je ne le conseille peut être pas parce que je ne sais pas combien de temps mes faux diamants resteront collés à mes baskets :)
Etape1. Commencez à appliquer le scotch sur la semelles de vos baskets et partout où vous ne voulez pas de paillettes. Si vous voulez vraiment faire ces Miu Miu replicas, laissez aussi l'avant de vos baskets sans paillettes (un peu comme le bout blanc des Converses).
Etape2. Commencez à mélanger la colle et les paillettes dans le petit pot en plastique. J'ai utilisé un peu moins de 25 ml de colle et un pot de paillettes argentées (15 gr) et un demi pot de paillettes noires (8 gr).
Etape3. Prenez votre pinceau et commencez à appliquer votre mixture pailletée sur vos baskets.
Etape4. Laissez sécher et quand c'est sec, enlevez le scotch de vos baskets. Vous pouvez aussi remettre les lacets sur vos baskets une fois que c'est sec.
Etape5. J'ai du passer par une étape supplémentaire car le bout de mes baskets étaient noir et argenté et je voulais avoir une couleur unique avant de commencer à appliquer les faux diamants. J'ai donc décidé de peindre en noir (peinture spéciale pour chaussures, voir Shoe Makeover Article) et de laisser sécher.
Etape6. Vous pouvez enfin commencer à appliquer les faux diamants, clous de votre choix sur le bout de vos baskets. C'est à votre tour d'être créatif et de personnaliser vos baskets comme vous le souhaitez! J'ai pris ce qui me passait sous la main (plus de clous que de faux diamants mais je suis contente du résultat!)
Fi: Hei! Se on pitkä aika, kun olen kirjoittanut mitään tästä blogista. Anteeksi! Olemme menossa monessa paikassa (Tukholma, Nokia/Tampere viimeiset häät tänä kesänä ja mökki). Välillä olen etsinyt työtä, joka vie minulta paljon aikaa! Mutta joka tapauksessa, tänään on noin Miu Miu lenkkarit DIY. Halusin glitter lenkarit pitkään niin tämä DIY tuli oikeaan aikaan. Minulla oli vanha lenkkarit että halusin myydä kirpputorilla, ja olen iloinen että ei kukkaan ostanut niitä!
Tästä DIY, tarvitset:
- lenkkarit
- vedenpitävä liima (25ml)
- glitter (haluamanne väri, 20-25 gr)
- pienet ja keskisuuret harjalla
- valikoima strassit (tai nastoja tai mitä on)
- pieni muovinen tarjotin
- teippi
- liimapistooli (soveltaa strassit mutta neuvoisin liima)
Vaihe1. Aloita teippaaminen ainoa oman lenkkarit ja osaan, jossa et halua kimaltelevat. Jos haluat kopio Miu Miu lenkkarit, sinun pitäisi myös teippi yläosassa lenkkarit (pieni valkoinen osa Converse).
Vaihe2. Aloita sekoittamalla liima ja glitter vuonna hieman muovinen tarjoitin. Määrä glitteriä ja liimaa riippuu hyvin paljon teidän lenkkarit. Käytin hieman alle 25ml liimaa ja 15gr hopeaa glitteriä ja noin 8gr mustaa glitteriä.
Vaihe3. Voit ottaa keskipitkällä harjalla ja alkaa maalaamaan oman tossut glitter/liimaa.
Vaihe4. Anna kuivua, ja kun se on kuiva, teippi pois. Voit myös laittaa teippit takaisin teidän lenkkarit.
Vaihe5. Minun täytyi maalata hieman etuosa, koska siellä oli hopea ja musta ja halusin olla yksi väriä, mutta tämä voi olla vain vapaaehtoista askel niille, jotka ovat yksi väri lenkkarit.
Vaihe6. Voit alkaa käyttämään niitä strassit, timantit edessä lenkkarit. Hain strassit ja painonapit. Mä vain meni, mitä olin... Käytin liimapistooli kiinni strassit edessä lenkkarit mutta en todellakaan ole varma, kuinka kauan strassit kestää minun lenkkarit! (Aion pitää sinut ajan tasalla :)
looks great! I think I might have to try this myself! :)
ReplyDeleteHei Anni! GREAT! Please do. Try and show me the result! I would love to see that! If I would have another pair, I would try the gold one :) I try to put those in an outfit soon! I think those one might look nice with a jean when it's not too rainy in Helsinki! Cheers, let's keep in touch! +++++++++
ReplyDeleteThey are so beautiful!! Well done :)
ReplyDeleteInteresting! You're so crafty. :)
ReplyDeleteMeant to say, I bought the base you mentioned in your post about skin care. L'Oreal something or other - It's WONDERFUL!
Thanks Jen!!!! I'll show you those sneakers. I had them on today for a run test and it went great :)
ReplyDeleteLauri said to me that I should moowalk to restaurant as I have Michael Jackson shoes ................... oi oi oi!
And im glad you like that L'Oréal stuff. I also think it's brilliant!